Feeds:
Posts
Comments

Posts Tagged ‘dessert’

In the late 19th and early 20th centuries, British occult writer James Churchward became known for his studies of the lost continent of Mu, spanning the breadth of the Pacific Ocean and connecting the Polynesian Islands. Expanding on the ideas of Augustus Le Plongeon, Churchward claimed that the island was the site of the Garden of Eden and the native Naacal people spawned the great ancient civilizations of the ancient world such as the Maya, the Egyptians and the Babylonians.

mumap2

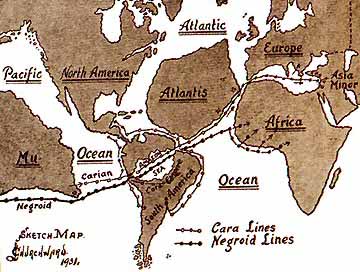
Churward’s own map, drawn in 1931, shows the migration of the Naacal eastward towards South America, through the great Amazon Sea, with distinct groups parting ways near the southern coast of Atlantis. However, as such civilizations normally do,  Mu was destroyed in a single day and night and lost beneath the waves, its knowledge and technology with it. Modern science has definitively shown that Mu, Atlantis and other lost continents exist purely in the realm of pseudoscience, because the planet doesn’t work that way. It’s a fun story nonetheless.

The 45th week of Reddit’s 52 Weeks of Cooking Challenge brings us to the Pacific Islands. I’ve always had a fascination with mysteries of the ancient world, much like Mu. Rapa Nui, better known as Eastern Island, is one of those mysterious things that’s just incredibly captivating. While they’ve pretty much figured out what’s up with the Moai, the cuisine of the island hasn’t been looked into much with modern eyes and ears.

img_4025 
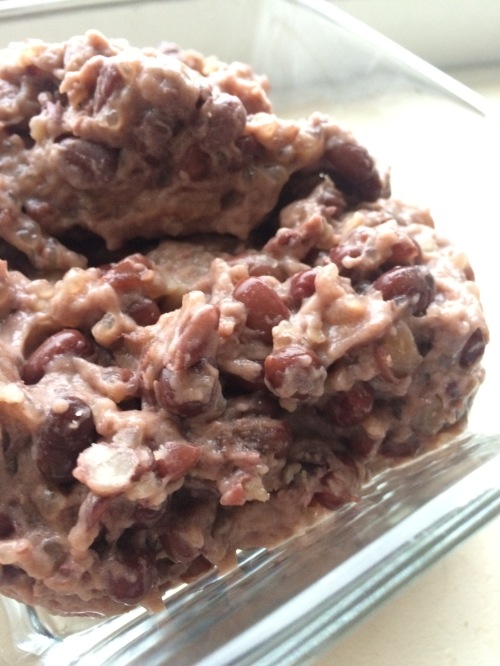
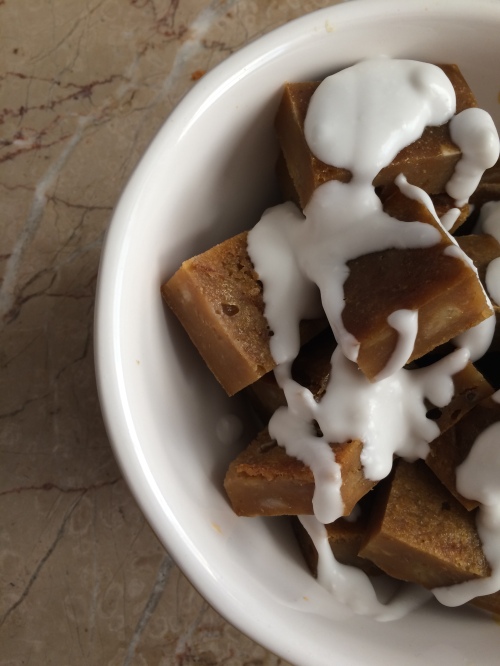
Po’e is a traditional dessert served throughout Polynesia. Typically made with banana or plantain with various tropical fruits, the Pascuanese version is known for using pumpkin. The fruits are mashed until smooth before being mixed with sugar, starch and a bit of vanilla. As with most traditional dishes in the area, it would normally be wrapped in banana leaf and baked in an buried oven. Once cooled, it’s cut into pieces and served with fresh coconut cream.

All the recipes I read refer to Po’e as more similar to a pudding, but that doesn’t really seem right. I would say it’s more like a less bready-y banana bread. Whatever you want to call it, it’s certainly delicious and makes for a filling breakfast or a light dessert to cap off a meal.

Po’e

makes about 3 servings

  • Banana, medium, 4 each*
  • Pumpkin, canned, 1 can*
  • Brown Sugar, 1/2 cup
  • Cornstarch or Arrowroot, 1 cup**
  • Vanilla Extract, 2 teaspoons
  • Coconut Cream, as needed***

Preheat oven to 375F. Puree bananas and pumpkin in food processor until completely smooth. Sift together brown sugar and cornstarch. COmbine dry ingredients with puree and vanilla, mixing to combine evenly. Butter a 9×9 baking dish and add banana mixture. Baking at 375F about 35 minutes, or until center is set. Allow to cool completely before cutting and serving with coconut cream.

*A lot recipes suggest trying it with mango, pineapple or papaya. The goal is to have 4 cups of puree total, regardless of its constituents.

**Arrowroot is more traditional, but also more expensive. Your call.

***Full-fat canned coconut milk will separate when refrigerated. Chill the can, scoop fat from the top, and add enough of the milk to make a sauce with the consistency of a loose custard.

Read Full Post »

Cooking has always been one of a very few things that’s a constant in my life. I knew I wanted to be a chef by the age of 9 or so, and since then I’ve always cooking, reading, watching and learning everything I can about this crazy world of food. And while it can be a huge struggle to balance the life of a professional chef with still being interested in food and cooking when at home, it’s worth it when you  get to do what you love. But when work life get to be too much, nothing makes your sparse days off better than sitting down with a cold beer and one of my other great passions: Video games!

I think the way that I got into video games at such a young age is that my dad is/was a huge nerd. He always had lots of computers and parts he was working on, and on an old MSDOS machine, the first game I ever remember playing was Magic Candle II: The Four and Forty, and very D&D-esque dungeon crawling RPG. Since then I have always enjoyed video games. Initially just for the entertainment value, as I’ve gotten older I’ve come to appreciate them more as an art form in their own right; Truly immersive, interactive storytelling unlike any other medium. With food and video games both being such great passions, I’ve been looking forward to this week’s cooking challenge since I knew it was coming up.

For two things that are so important to me, I knew that I needed to do something really fun and exciting. One of my favorite games is also one of the more outwardly simplistic games out there. One that provides equal joy or both casual players and dedicated veterans alike. Run, jump, shoot. That’s it. I’m talking about none other than Valve’s cult hit Portal. In Portal, you play as Chell, a test subject for Aperture Science’s handheld portal device, a gun that allows you to create portals between any two points.  Cubes, buttons, lasers, and deadly neurotoxins  fill the landscape of the eerie test chambers with the promise of being rewarded for your efforts with cake. And if you’ve ever been on the internet at all, I’m sure it comes as no surprise that the cake is, in fact, a lie.

IMG_3119.JPG

As it appears in an unplayable portion of the game (which can actually be accessed though a glitch in the programming), The Cake is a Black Forest cake decorated with whipped cream and cherries, inspired by a Chinese bakery near the studios where the game was developed. So setting out to make the cake that the internet fell in love with, I had two goals in mind. The first being that it had to look the part. That was fairly simple: Homemade German chocolate frosting, whipped cream, maraschinos. Boom. The second criteria, and arguably the more crucial, was that the cake had to be a lie. The best way I could think to accomplish this, was to not make a cake at all. Rather than an actual black forest cake, this is an incredibly  bootleg version of Heston Blumenthal’s Perfect Black Forest Gateau. Here’s the run down: Shortbread cookie crust spread with apricot jam, chopped 3 Musketeers chocolate bar, a layer of cherries, a layer of hot fudge, a layer of brownie to cover everything, then a layer of kirsch infused vanilla custard, then topped with the frosting, whipped cream and more cherries.

It’s really more  like a dessert casserole than a cake, an it’s certainly not anything like the gateau. It’s also an awful lot of effort to put into what is essentially a big joke, but for those efforts you’re more than rewarded with how great it tastes.

This was a triumph. I’m making a note here: huge success. It’s hard to overstate my satisfaction.

Read Full Post »

We all know and love tacos. They’re one of the many, many foreign foods that have readily entered American culture and persisted for generations. Whether you hail from the southwest and grew up with the more traditional styles of Mexico, or you’re like me and longed for the nights when your parents would bust out the big red Taco Bell kit-in-a-box, everyone has their favorites.  The best tacos I’ve ever had came from Tacos Garcia, a small white truck in Yountville, California, about a block down the street from The French Laundry: fresh corn tortillas, slow roasted pork, pineapple, radish and cilantro; super traditional Al Pastor. If you’re unfamiliar with tacos, I don’t think I have enough skill as a writer to illustrate exactly how amazing they are and what exactly you’re missing out on. So with that being said, I think it wouldn’t do me any favors to try and go on and on before getting into the recipe. I’ve had my share of experience working with traditional taco styles, so this week I wanted to play around with probably the least traditional form they’ve taken over the past three decades: The Choco Taco.

IMG_2781.JPG

A Choco Taco is a specific kind of ice cream sandwich built to resemble a taco. Normally wrapped in a thin waffle cone type shell, filled with vanilla ice cream and topped with a hard chocolate shell. Lacking the ability to make a waffle cone myself, I opted for a thin, sweet pancake-like wrapper. Taking a cue from the folks over at Food52, once the cakes were done cooking, I draped them over the spine of a book to help them form as they cooled. For the filling, I wanted to try Avocado ice cream. I  already knew that avocado and chocolate make a surprisingly awesome pairing, so it really wasn’t that much of a leap. Sweet, but not too sweet, and a healthy dose of the rich avocado flavor made it perfect for dessert. After a quick dip in dark chocolate and a topping of hazelnuts, the tacos are ready to go. They hold up really well in the freezer, but if you’re at all like me, they won’t last very long. Feel free to play around with your favorite kinds of ice cream and various different toppings! I bet this would go great with cinnamon and chili, sort of like Aztec-style cocoa drinks.

Avocado Ice Cream

makes about 6 cups

  • Avocado, ripe, 4 each (small to medium)
  • Sweetened Condensed Milk, 1 14oz can
  • Heavy Cream, 1 1/2 cups
  • Whole Milk, 1/2 cup
  • Granulated Sugar, 3/4 cup
  • Vanilla Extract, 1 teaspoon
  • Lemon Juice, 1/2 teaspoon

Peel and pit avocados. Puree in a blender or food processor until smooth. Add remaining ingredients and process until thoroughly combined. Churn in ice cream machine according to manufacturer’s instructions.

Pancake Shells

makes about 6 shells

  • All-Purpose Flour, 2/3 cup
  • Granulated Sugar, 1/2 cup
  • Kosher Salt, 1/8 teaspoon
  • Butter, unsalted, 2 tablespoons
  • Whole Milk, 1/4 cup plus 1 teaspoon
  • Almond Extract, 1/4 teaspoon
  • Vanilla Extract, 1/2 teaspoon
  • Egg White, 2 each

Sift together dry ingredients. In a separate bowl, melt butter. Combine with milk, extracts and egg whites, mixing thoroughly. Add wet mixture to dry mixture, mixing just enough to combine. Heat a nonstick skillet over medium-high heat. Cook batter about 2 tablespoons at a time, spreading out as thinly as possible, about 1 minute on each side. While cakes are still warm, drape over the spine of a book while cooling to form shells. Fill with ice cream to form tacos and allow to set 15 minutes in the freezer.

Chocolate Coating

  • Dark Chocolate chips, 10 oz
  • Coconut Oil, 3 tablespoons

Melt chocolate and coconut oil together over a double boiler. Dip pre-frozen ice cream tacos in chocolate to coat, and top as desired with nuts, sprinkles, or candy.

Read Full Post »

As we make our way into the second half of Reddit’s 52 Weeks of Cooking Challenge, we take on a subject of great debate. Depending where your own culinary experience and background, creating dishes from scratch may or may not seem such a daunting task. Since the industrialization of the American food system in the early 20th century, recipes and cookbooks developed to rely on ready-made ingredients to ease the burden place on home cooks, and free up more time for whatever else they wanted to do. So nowadays, it’s often “a box of this, two cans of that”, and it’s just like mom used to make. And sometimes, utilizing processed ingredients will actually yield better results. I briefly worked with a chef  who boasted that everything was made from scratch except ketchup, because “you can’t make ketchup better than Heinz” (a statement which I debate with myself constantly), and I can tell you from experience that at Thanksgiving time, a from-scratch Green Bean Casserole doesn’t hold a candle to opening a can of mushroom soup and  French’s Fried Onions. Many cooks grew up accustomed to these kinds of dishes, so when you do the recipe totally from scratch, it  almost feels more like more of an accomplishment. Reaching for flour and cocoa rather than a box of brownie mix is definitely more rewarding, if not a bit more time consuming.

On the opposite side of things, in professional kitchens, if you’re not doing your menu nearly entirely from scratch, it’s viewed as lazy. In the modern restaurant, from scratch is just how things are done. It’s more work, but it sets you apart from lower-end establishments. And with margins as slim as they are already, customers aren’t interested in paying for things they can buy at the grocery store.

I think I land somewhere in the middle of this paradigm: As a professional cook, I have the mentality of wanting to everything from scratch, even when I cook at home. But a lot of times, you can’t do at home what you can do in a working kitchen, and it’s costly to try at that. But, there are definitely things that you can do at home pretty easily and cheaply to give yourself the accomplished DIY feeling we all long for.

The late, great Carl Sagan once said “If you wish to make an Apple Pie from scratch, you must first invent the universe”. It’s comment on how the constituent particles that make up the world around us all had to have come from somewhere else, and we’re just kind of rearranging things that are already here. Even with my professional background, I  think creating the universe to make a pie is a bit out of my range, but Apple Pie can be a good jumping-off point.

IMG_2569.JPG

So to make is as from-scratch  as possible, I decided that there were really just two things I could do out of the ordinary:

Grind My Own Flour: Luckily, the bulk section at the supermarket carries whole wheat berries, so it was just a matter of picking some up and grinding it as finely as possible. You can buy countertop grain mills for home use (which I’ve read are pretty effective), or if you have access to a high-power blender, that works pretty well too. Either way, I really wouldn’t suggest doing this, at least for a pie crust. The resulting product is incredibly coarse, and as you can see in the photo above, yields a very crumbly crust, closer to a cobbler than a pie. The flavor was alright, but the texture was way off. In any case, it was something I had never tried before, so even the negative results are beneficial.

Make My Own Butter: This one is actually super simple for anyone to do at home. All it involves is cream and agitation, maybe some salt if you want to, but that’s it. Just add cream to the bowl of a stand mixer or food processor and whip the shit out of it. It will begin to thicken to whipped cream consistency and eventually break into solid butterfat and liquid buttermilk. Collecting the small yellow lumps of butterfat into a mass and squeezing any residual liquid out of it yields an immensely rich and creamy butter that will function exactly the same as the store bought variety.

So really, the crust was the biggest thing done from scratch, and it was kind of a letdown overall. However, I used Alton Brown’s Super Apple Pie recipe for the filling and was blown away by the results. Largely the same as most filling recipes, the big differences here are lime juice and Grains of Paradise, a spice commonly used in English baking . Unless you’ve got a homebrew store nearby, you’re unlikely to come across Grains of Paradise. Black Pepper is a great substitute, which I used myself, and provides some really interesting savory notes to an otherwise very sweet dessert.

So, the lesson learned here? Don’t grind your own flour for pie crust, but definitely make your pies from scratch.

Read Full Post »

I have to say, was I pretty pissed off this past week. Let me give you some context: Earlier in the week, temperatures in Vermont got up to the mid 60’s. That’s a bit higher than average for this time of year, so needless to say everyone was excited. I walked home from work in shorts. And with this week’s challenge being Brazilian cuisine, I was ready to get into the warmer weather with some lighter recipes. Then, just as quickly as the warm weather came…

IMG_1952

And that’s a warm day,  it’s gotten down to the low teens at some points. Why does the weather hate me? Even with the Snow Miser creeping down our necks once again, I was determined to enjoy something a little bit more tropical for the 52 Weeks of Cooking Challenge.

IMG_1951.JPG

Maracuja is a dessert typical throughout Brazil, finding it’s way to home kitchens and restaurants alike. A lightly sweetened Passion Fruit mousse, Maracuja is incredibly simple to make, and doesn’t actually require any cooking at all. The real secret is fresh Passion Fruit. Luckily the grocery stores in my area typically have a good selection of exotic fruits and I could get my hands on some. The thick burgundy peel gives way to a bright yellow, citrusy flesh that yields some pretty potent juice. The small black seeds are also edible, and give a really nice crunch to the finished mousse (not to mention the visual appeal).

Maracuja

makes about 4 servings

  • Fresh Passion Fruit, juiced*, 8 each
  • Granulated Sugar, 1 tablespoon
  • Sweetened Condensed Milk, 1 14oz can
  • Heavy Cream, 2 cups
  • Passion Fruit Seeds, to garnish (optional)

Combine juiced Passion Fruit with sugar and sweetened condensed milk, stirring to combine evenly. In a stand mixer, whip heavy cream to stiff peaks. Gently fold Passion Fruit mixture into whipped cream until thoroughly combined (there should be no streaks). Chill at least 2 hours before serving. Garnish with rserved Passion Fruit seeds.

*Fresh Passion Fruit isn’t all that easy to come by, and even at that they aren’t cheap (I think I payed $15 for 8). If you can’t get them fresh, or don’t want to splurge on them, substitute 1/2 cup of Passion Fruit juice concentrate.

Read Full Post »

It can easily be argued that food, and cooking in general, can be viewed as an art form. And in a way, it can certainly be thought of on the same level of art as music, film, literature, or traditional media (painting, sculpture, etc); Practitioners of their discipline spend years, if not their whole lives, developing their style and honing their craft, often to little praise or recognition, simply for the love of doing it. But food is very, very different from other art forms. You can look at a painting, for example, and it will make your brain work in a certain way. You  can listen to a song, and your brain may work in different way. Through sight, sound, and in certain cases, touch, you can start to understand what the artist was trying to convey. But with food, you also have to eat it, and that creates another layer of meaning. What I mean, is that you don’t have to taste a book to “get it”, you know? Taste and flavor creates another means of conveying a message or an idea. And I think by adding that extra layer, the sensory experience is brought to completion.

With food being *so* dependent on the sensory aspects, what happens when you intentionally distort those aspects? The theme for week 14 of Reddit’s 52 Weeks of Cooking Challenge is “Food in Disguise”, focusing on altering our visual perception of a dish. As anyone familiar with Food Network could tell you, there’s a whole world of bakeries that specialize in making cakes that look like other things. While that’s all well and good, and certainly requires immense artistic skill, from what I’ve heard these types of products don’t taste as good as they look. And with taste being one of the defining aspects of the experience, it’s paramount to maintain an appropriate composition of flavors. I think the best way to do this is to work with established pairings. Simply swapping sweet and savory preparations can easily accomplish some visual trickery that maintains its integrity as good tasting food.  Meatloaf Cupcakes, anyone?

FullSizeRender

I think the biggest challenge for this week was to start with a base idea, then make something that looks the part while still holding it’s own as an independent dish. I’ve made dessert pizzas before, but generally they’ve included a thick, cream cheese or buttercream type frosting, fruits cut and arranged to show off their natural beauty, and sometimes chocolate or another sauce drizzled over the top. Visually speaking, fruit pizzas are very dessert-y. But with a little ingenuity, a margherita-style or Neapolitan-style pizza is well within the realm of possibilities. In Naples, thin crispy crust reigns supreme, so rather than puff pastry or pie dough (which is pretty common for dessert pizzas), I went with a sugar cookie base. The sauce was actually really interesting to work on: Modernist Cuisine at Home has a really cool recipe for a strawberry marinara. Theirs is a savory sauce, made with onions, garlic, basil, and around 25% tomatoes. At first, I wanted to make that recipe straight-up, but that would probably compromise the flavor of the dish, so that was a no-go. But using their recipe as a base, I made a sweeter, slightly more jammy strawberry sauce. For cheese, mascarpone stands in for the traditional buffalo mozzarella. And no margherita pizza would be complete without some fresh herbs, so I added a healthy sprinkling of tarragon, giving a bright anise flavor to contrast the deep red sauce.

With this dish, I definitely accomplished the taste and flavor of it, but I was really surprised how strongly the visual aspect affected the experience. While we were putting the pizza together, my ladyfriend blurted out that she really wasn’t in the mood for a heavier, tomato-sauce-kind of pizza, even though she knew it wasn’t. And while we were eating it, it felt like eating a pizza. Just the act of cutting it into slices and picking it up the way you would a slice of regular pizza made me expect a certain flavor and texture. Even though I made the entire thing from start to finish myself, and knew that it wasn’t a savory pizza, it’s hard to overcome the patterns that you’ve learned over a lifetime. So when all’s said and done, I think I succeeded in both of the major aspects of this week’s challenge.

Pizza Margherita (Dessert Style)

makes 1 pizza

  • Prepared Sugar Cookie Dough, 1 package
  • Strawberry “Marinara”, as needed (recipe follows)
  • Mascarpone cheese, about 4 ounces
  • Fresh Tarragon, about 1/4 cup

Preheat oven to 350F. Lightly flour a large pizza pan. Roll out sugar cookie on pizza pan to 1/4 inch thickness, flouring dough lightly as needed. Bake cookie dough at 350F for 8-10 minute, or until nearly set in the middle and edges start to brown. Remove from oven,and turn broiler to high. Spread cookie crust with strawberry sauce and add dollops of mascarpone across the whole pizza. Cook under the broiler until cheese is melted, about 2-3 minutes, being careful not to scorch the crust. Remove from oven and allow to cool completely. Cut into slices and top with fresh tarragon.

Strawberry “Marinara”, adapted from Modernist Cuisine at Home*

makes about 2 cups

  • Slivered Almonds, 50g
  • Strawberries, 500g, pureed
  • Strawberries, thinly sliced, 250g
  • Raspberries, 170g
  • Sweet White Wine, 100g
  • Brown Sugar, 105g

Toast almonds in a sauce pot over medium heat until fragrant and lightly browned, about 3 minutes. Add remaining ingredients, mixing to combine thoroughly. Continue cooking over medium heat until thick and reduced, about 30 minutes**. Remove from heat and allow to cool completely before use.

*Modernist Cuisine generally gives all their recipes measured by weight, and I have a scale that will measure grams, so I went for it. I suggest buying a good kitchen scale for lots of reasons, but if you don’t have one just eyeball the ratios.

**I actually fell asleep at this point, but I’m guessing it was around 30 minutes.

Read Full Post »

**If you asked me to, I don’t think  I could even point out Malaysia on a map. I mean, I think it’s in the Western portion of Southeast Asia. Maybe? Your guess is as good as, if not better than, mine. In recent years, it’s seemed that these once-little-known cuisines of Asia have seen a boom in their popularity; Thai and Vietnamese are clearly  big winners here, but here in Burlington we even have a pretty fantastic Nepalese restaurant. But in all this resurgence, Malaysian cuisine has seen very little, if any, success. Needless to say, Malaysia is the destination for the 11th week of Reddit’s 52 Weeks of Cooking Challenge, which has given me a great opportunity to learn about this weird little country and it’s weird culinary heritage.

Like most countries in the area, Malaysia has a melting pot cuisine, drawing on influences from their neighbors, indigenous people, and colonists. While traditional dishes still persist, the biggest influences can be seen from Thai, Portuguese, Dutch, English, and French cuisines. I’ve been wanting to get some more desserts in my repertoire, so my research into Malaysian cuisine began there. Much to my surprise, Malaysia has a wide range of desserts and sweets, spanning the gamut of their many cultural adaptations. The common thread through many of their desserts (also seen in their savory dishes) is coconut milk rather than dairy, and the use palm sugar as a sweetener. One dish that piqued my interest showcased both of these ideas.

IMG_1720.JPG

Before we go any further, I just want to get it out of the way that this is probably the least photogenic dish I’ve cooked in a long time.

Bubur Kacang Merah is similar to an Indian rice pudding (I think translating from Malay puts it a little closer to porridge), but made with red beans rather than rice. What makes this dish really unique is that the starches in the beans don’t convert to sugars  as easily as they do in rice, which creates a much less sweet final product; I don’t really prefer sweet desserts anyway, so this was really cool for me. Other than that, the Merah is prepared almost identically. Just like all dried beans, you need to soak them for a bit to soften them up before cooking. The beans are then cooked in water with salt and Pandan leaves until soft. Pandan is an aromatic herb common in Southeast Asia, but almost unheard of elsewhere. Even with the wealth of Asian markets in my area, I couldn’t find any Pandan or even Pandan extract. As it turns out though, Pandan is in a similar family to vanilla, so it’s a pretty easy substitute. When the beans are almost all the way done, Sago (a starch derived from palm, similar to tapioca) is added to thicken the liquid. Sugar and coconut milk are stirred in right at the end to bring a light sweetness to the beans and it’s done! Served hot out of the pot or chilled and thick, this is definitely a weird dish if you’re accustomed to sweet desserts. If you can get past the somewhat mild sweetness and the earthy-ness of the red beans, this is a really great dessert to add to your arsenal.

Bubur Kacang Merah (Red Bean Pudding)

makes about 2 servings

  • Adzuki Beans, dry, about 1 cup
  • Water, as needed
  • Vanilla extract, 1/4 teaspoon
  • Almond extract*, 1/8 teaspoon
  • Kosher Salt, 1/2 teaspoon
  • Sago or Tapioca Pearls, small, 2 tablespoons
  • Palm Sugar or Light Brown Sugar, 3 tablespoons
  • Sugar, 1 tablespoon
  • Coconut Milk, 1 1/2 cups

Soak beans in water for 30-60 minutesl. Transfer beans to a sauce pot and cover with 2-3 cups of water. Add vanilla, almond and salt. Bring to a boil, reduce to a simmer and continue cooking until beans are soft, about 1 hour, adding water as needed. When bean are nearly done, add sago or tapioca, stirring to mix thoroughly. Continue cooking until beans are done and sago is translucent. Remove from heat, stir in sugars and coconut milk. Serve hot or cold.

*I had some almond extract in the pantry, and I figured it could help create a more aromatic effect since I didn’t have Pandan leaves. If you don’t have any, it’s totally optional.

**Backstory of the title is actually kind of hilarious. A coworker revealed to me that she had always thought the lyrics in Def Leppard’s Pour Some Sugar On Me were “You’ve got the peaches, I’ve got the Beans” rather than “You’ve got the peaches, I’ve got the cream”, and the way she revealed this was by saying I was going to pour some sugar on somebody with my green bean (maybe a dick reference? I don’t really know).

Read Full Post »

As the iconic government-issued infographic says, grains were once thought to be the mainstay of any healthy diet. However, more recent versions of the pyramid boast the benefits of a diet more balanced between fruits, vegetables, proteins and grains.  While highly processed grains and flours were once a sign of nobility and wealth, we’ve seen a trend in recent years towards cooking and eating whole grains. When less processed, grains retain more nutrients from the outer husks, thus making them better for you and easier to digest. We’re drawing near to the end of the 52 Weeks of Cooking Challenge, and whole grains are the name of the game!

ricepudding

One of my favorite grains to cook, and one that is common in nearly all world cuisines, is rice. And as far a whole grain is concerned, nothing beats Forbidden Black Rice. Black rice contains an extra thick outer coating of bran, giving it the signature color and nutty flavor. Often called “forbidden” because it was once eaten solely by the ruling class of China, due to it’s rarity and high nutritional value, black rice has made it’s way into more mainstream cuisine throughout southeastern Asia. I’ve never cooked with the rice before, so I figured this week would be as good as any to try it out. Rice doesn’t make much of a dish on it’s own, unless you make some delicious rice pudding. Since black rice has the extra outer coating, it needs to be par cooked in water to soften the grain before the final cooking in coconut milk and sugar to create a rich, thick dessert. While it’s just as good cold or  room temperature, I like mine still warm from the pot. Perfect for the upcoming long, dark nights of winter.

Forbidden Black Rice Pudding

makes about 3 cups

  • Black rice, 1 cup
  • Kosher Salt, 1/2 teaspoon, divided
  • Sugar, 1/2 cup
  • Coconut Milk, full-fat, 1 can (15oz)

Combine rice, 1/4 teaspoon salt and 3 cups water in a medium sauce pot. Bring to a boil, reduce to a simmer. Cook, covered, over low heat for about 45 minutes. Add sugar, 1/4 teaspoon salt and coconut milk, stirring to combine. Bring to a simmer and continue cooking until thick and creamy, about 30 minutes. Serve warm, room temperature or cold.

Read Full Post »

Fall is finally here! At least in Vermont it is, and that means it’s time to break out the flannel, read Robert Frost and eat your weight in pumpkin spice everything. By far, fall is my favorite time of the year. Cold, rainy days speckled with days where it’s still warm enough to wear shorts, not to mention the beautiful scenery and foliage. One of the greatest things about fall? Apples are in season! After maple syrup and terrible jam bands, apples are one of Vermont’s most iconic crops and are used in a wide variety of products, from butters and jams to ciders both soft and hard. One of the first things I ever learned to cook was Apple Crisp, as evident by a presentation I did in 7th grade.  Needless to say, I’m more than excited for the 37th week of Reddit’s 52 Weeks of Cooking Challenge!

When I was younger, every year my grandma would take my brother and I out to this one orchard to pick apples and visit the petting zoo. After eating myself sick and not actually bringing any apples homes, we would stop by the farmstand for a cup of cider and maybe a snack for the road. One of my favorite treats we had over the years for an amazing apple pie that they topped with sharp cheddar cheese. When I was a kid, I never thought much of it. I liked cheese,  I liked apples, I liked pie. No further questioning needed. But as I’ve gotten older, especially around this time of year, I always think back to that orchard and I’ve finally decided to see what was up with the cheddar apple pie.

apple galette

There’s an old English saying that goes “An apple pie without the cheese is like a kiss without the squeeze.” Originating around Yorkshire, where apples and sharp cheese are both abundant, the tradition of serving sweet apple pie with cheese has been around since at least the 19th century. While little info is available on exactly how it got started, my guess is that the fat from the cheese was used to help cut the acid of wild apples that are especially tart or bitter. Either way, the combination is here to stay. I started out with a flaky crust, halfway between a biscuit dough and a traditional pie crust. Rather than the traditional sharp cheddar cheese, I decided to go with a raw, 1 year aged, maple-smoked cheddar. The smokiness of the cheese would add another level to the sweet-and-savory contrast that was already going on. A little bit of cheese went into the crust, then set up in the fridge, waiting to be rolled out. As for the star of the show, I like to use a blend of different apples. I have a blend that I use for homemade cider that also worked out quite well for baking: Fuji, McIntosh, Cortland and Granny Smith. Each of these apples carries a different level of sweetness and acidity, as well as breaking down at different rates during cooking, giving the pie a bit more texture and depth than your standard fare. The apples got tossed with cinnamon and maple to marinate for a bit, folded up in the crust, and topped with a healthy dose of cheese. Baked until golden brown and melty, this might just be the best pie I’ve made in a very long time. The crust was tender and flaky, although the cheese didn’t really come through in the crust itself. But what the crust was lacking in cheesiness was more than made up for by the filling. The sweet spices in the apples and the smoky cheese create the ultimate combination of contrasting flavors.

Apple Galette with Smoked Cheddar

makes 1 pie

For the Crust:

  • All-Purpose Flour, 1 1/2 cups
  • Kosher Salt, 1/2 teaspoons
  • Sugar, 1 1/2 teaspoons
  • Butter, unsalted, 6 ounces
  • Sour Cream, 1/4 cup plus 2 tablespoons
  • Smoked Cheddar Cheese, shredded, 2 tablespoons

For the Filling:

  • Juice of half a Lemon
  • Fuji Apple, 1 each
  • McIntosh Apple, 1 each
  • Cortland Apple, 1 each
  • Granny Smith Apple, 1 each
  • Vermont Maple Syrup, 1 tablespoon
  • Cornstarch, 2 teaspoons
  • Cinnamon, 1 teaspoon
  • Smoked Cheddar Cheese, shredded, 1/2 cup, lightly packed
  • Egg, beaten, 1 each
  • Brown Sugar, as needed

In a large mixing bowl, combine flour, salt and sugar, mixing thoroughly. Cut butter into chunks and add to flour mixture. Rub butter and flour together with your hands until the butter is about the size of peas. Add sour cream and cheese, mixing to form a dough. Remove dough from bowl onto a lightly floured work surface. Shape dough into a thick disk and wrap in plastic. Place dough in refrigerator to set, at least 30 minutes and at most overnight.

Juice half a lemon into a large bowl of water. Peel, core and slice apples, placing them into the lemon water as you work. Once all apples are processed, drain the lemon water from the bowl. Combine apples with maple syrup, cornstarch and cinnamon, tossing to coat evenly. Allow to marinate at least 10 minutes.

Preheat oven to 400F. Working on a lightly floured surface, roll out dough into a circle about 14 inches wide by 1/4 inch thick. Transfer dough to a parchment-lined baking sheet. Arrange apples in the center of the crust as desired, and top with remaining cheese. Fold edges of the crust over the apples, leaving the center open. Brush crust with egg wash and sprinkle lightly with brown sugar. Bake at 400F for 10-15 minutes, until crust starts to brown and cheese begins to melt. Lower temperature to 375F and continue baking for an additional 10-15 minutes, until crust is cooked through. Allow to cool at least 10 minutes before serving.

Read Full Post »

Beyond any other medium, the art of food is truly an experience for the senses. Sight, sound, smells, touch, and of course taste all play an integral role in food and the act of eating and dining. Taste, the most obvious component, is the one that people think of most often when they think of food. Once, I listened to Chef Grant Achatz discuss, for no less than 20 minutes, whether or not food needs to taste good. I can totally see where he’s coming from: as with any other art form, food needs to be subjective in order to be appreciated as such. You don’t have to like everything to appreciate the art behind it. But the idea blew my mind: food doesn’t need to taste good? What? Sure, you can not enjoy a particular piece of art for one reason or another. You can hate a certain genre of film or music while appreciating others. Just like a painting, novel, or sculpture, there can be endless reasons behind why a certain dish was made a certain way; it’s the chef’s interpretation of a dish that he had as a child, and the farm that raised the animals are making a sociopolitical statement of their beliefs through their practices. That’s awesome, and I’m totally behind the idea. But food carries a sensory experience beyond other art forms. You don’t need to chew on the Mona Lisa to understand it. If food doesn’t taste good, any other artistic meaning behind it goes right out the window. So as chefs and cooks, it’s our duty to, you know, make food that tastes good, in addition to providing a sensory experience for the guest. The easiest way to provide that kind of experience is through contrast. Everyone knows that food is more visually appealing when providing contrasting colors and textures in a dish, and flavor is no exception. The most common ideas that come up are sweet-and-savory or sweet-and-salty, providing a sweet element in a traditionally savory or hearty meal provides great contrast to what you’d normally expect, and conversely, adding a savory element to to desserts and really bring out the flavors of fruits and chocolates. Another way to add contrast to dishes is through differences in temperatures. Most won’t think of it this way, but adding a cool scoop of vanilla ice cream to warm apple pie is a classic pairing, as well as a dollop of sour cream in your chili. Hot and cold pairings provide not only contrasting flavors to amuse the sense of taste, but the difference in temperatures excites the sense of touch as well. For the 36th week of Reddit’s 52 Weeks of Cooking Challenge, this was exactly the kind of excitement that cooks were asked to explore.

As I normally enjoy doing, I bent the rules a little this week,. Playing on the ideas of contrasting flavors as well as temperatures, I decided to add a spicy kick to a classic frozen dessert. Presenting, Maple Sriracha Ice Cream!

sriracha ice cream

There’s not really too much I can say about this dish. Coconut based ice cream, sweetened with Vermont Maple Syrup and a healthy dose of Sriracha Chili Sauce. The heat and chili flavor are predominant, but the heat quickly fades and gives way to the sweet, creamy sensation we all know and love. I may have gone a bit overboard with the Sriracha in my original recipe, but the recipe below is modified to second version I made. Since I am still without an ice cream churn, I followed Dave Lebovitz’s great method for freezing without a churn and it came out incredible! While the days of summer are fleeting fast, the sweet-and-spicy, hot-and-cold dish is great for any time of the year.

Maple Sriracha Ice Cream

makes about 2 quarts

  • Full-Fat Coconut Milk, 2 cans
  • Vanilla Bean, split, 1 each
  • Corn Starch, 1 tablespoon
  • Vermont Maple Syrup*, 1/3 cup
  • Cane Sugar, 1/3 cup
  • Vodka, 1 1/2 tablespoons
  • Sriracha Chili Sauce, 2 1/2 tablespoons

Combine coconut milk and vanilla bean in a sauce pot. Bring to a simmer. Remove 1 tablespoon of warmed coconut milk and combine with cornstarch, mixing to dissolve. Add cornstarch slurry back to coconut milk with maple syrup and sugar. Bring to a boil, reduce to a simmer, and cook for 10 minutes. While mixture is cooking, fill a large bowl with ice and water (it should be mostly ice), and place another smaller bowl into the ice bath. When mixture is done cooking, transfer from pot to bowl in the ice bath and allow to cool completely, about 1 hour. Add vodka and Sriracha to ice cream base, mixing to combine. Freeze in ice cream churn, according to manufacturer’s instructions.

*I know I’ve brought this up before, but it’s always worth mentioning: There is no acceptable substitute for Vermont maple syrup. At all.

Read Full Post »

Older Posts »