Feeds:
Posts
Comments

Posts Tagged ‘baking’

As we make our way into the second half of Reddit’s 52 Weeks of Cooking Challenge, we take on a subject of great debate. Depending where your own culinary experience and background, creating dishes from scratch may or may not seem such a daunting task. Since the industrialization of the American food system in the early 20th century, recipes and cookbooks developed to rely on ready-made ingredients to ease the burden place on home cooks, and free up more time for whatever else they wanted to do. So nowadays, it’s often “a box of this, two cans of that”, and it’s just like mom used to make. And sometimes, utilizing processed ingredients will actually yield better results. I briefly worked with a chef  who boasted that everything was made from scratch except ketchup, because “you can’t make ketchup better than Heinz” (a statement which I debate with myself constantly), and I can tell you from experience that at Thanksgiving time, a from-scratch Green Bean Casserole doesn’t hold a candle to opening a can of mushroom soup and  French’s Fried Onions. Many cooks grew up accustomed to these kinds of dishes, so when you do the recipe totally from scratch, it  almost feels more like more of an accomplishment. Reaching for flour and cocoa rather than a box of brownie mix is definitely more rewarding, if not a bit more time consuming.

On the opposite side of things, in professional kitchens, if you’re not doing your menu nearly entirely from scratch, it’s viewed as lazy. In the modern restaurant, from scratch is just how things are done. It’s more work, but it sets you apart from lower-end establishments. And with margins as slim as they are already, customers aren’t interested in paying for things they can buy at the grocery store.

I think I land somewhere in the middle of this paradigm: As a professional cook, I have the mentality of wanting to everything from scratch, even when I cook at home. But a lot of times, you can’t do at home what you can do in a working kitchen, and it’s costly to try at that. But, there are definitely things that you can do at home pretty easily and cheaply to give yourself the accomplished DIY feeling we all long for.

The late, great Carl Sagan once said “If you wish to make an Apple Pie from scratch, you must first invent the universe”. It’s comment on how the constituent particles that make up the world around us all had to have come from somewhere else, and we’re just kind of rearranging things that are already here. Even with my professional background, I  think creating the universe to make a pie is a bit out of my range, but Apple Pie can be a good jumping-off point.
IMG_2569.JPG

So to make is as from-scratch  as possible, I decided that there were really just two things I could do out of the ordinary:

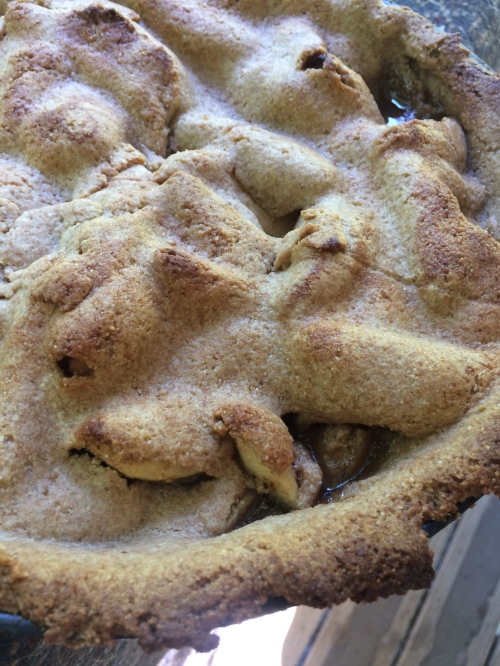
Grind My Own Flour: Luckily, the bulk section at the supermarket carries whole wheat berries, so it was just a matter of picking some up and grinding it as finely as possible. You can buy countertop grain mills for home use (which I’ve read are pretty effective), or if you have access to a high-power blender, that works pretty well too. Either way, I really wouldn’t suggest doing this, at least for a pie crust. The resulting product is incredibly coarse, and as you can see in the photo above, yields a very crumbly crust, closer to a cobbler than a pie. The flavor was alright, but the texture was way off. In any case, it was something I had never tried before, so even the negative results are beneficial.

Make My Own Butter: This one is actually super simple for anyone to do at home. All it involves is cream and agitation, maybe some salt if you want to, but that’s it. Just add cream to the bowl of a stand mixer or food processor and whip the shit out of it. It will begin to thicken to whipped cream consistency and eventually break into solid butterfat and liquid buttermilk. Collecting the small yellow lumps of butterfat into a mass and squeezing any residual liquid out of it yields an immensely rich and creamy butter that will function exactly the same as the store bought variety.

So really, the crust was the biggest thing done from scratch, and it was kind of a letdown overall. However, I used Alton Brown’s Super Apple Pie recipe for the filling and was blown away by the results. Largely the same as most filling recipes, the big differences here are lime juice and Grains of Paradise, a spice commonly used in English baking . Unless you’ve got a homebrew store nearby, you’re unlikely to come across Grains of Paradise. Black Pepper is a great substitute, which I used myself, and provides some really interesting savory notes to an otherwise very sweet dessert.

So, the lesson learned here? Don’t grind your own flour for pie crust, but definitely make your pies from scratch.
Read Full Post »

As I’ve mentioned a few times on here, bread is subject that is very near and dear to my heart. Bread is the thing that very first got me interested in cooking at a very young age. Bread was very nearly the entire reason that I went to culinary school. Last year, during a period of heavy depression and anxiety, bread got me back into cooking for myself and back into writing and helped me start taking back my crazy-ass brain. Going into the 13th week of Reddit’s 52 Weeks of Cooking Challenge with bread as the theme, I was already really excited about making bread. But this week also gave me a great opportunity to do some more research on a subject that’s been inescapable for me since first reading about it in Lucky Peach.

We’ve come to live in an era where bacteria isn’t necessarily seen as a bad thing anymore. Probiotic yogurts can be found on grocery store shelves everywhere, kimchi has seen a huge boom in the restaurant world, and there are countless sites and blogs detailing how home cooks can make  a transition back to more traditional foodways by creating lacto-fermented products. Bacteria and leavened bread have always gone hand in hand; Whether you’re making a yeast-risen dough or culturing your own sourdough starter, bacteria creates the gases that that are needed to give bread its light, airy structure (we can get into quickbreads another day). While certain bacterias can be really beneficial, today we’re looking at something on the complete opposite end of the spectrum.

Salt-Rising (or salt-risen) bread is a traditional style of bread that was common in Appalachia during early American settlement. The word “salt” in the name can be misleading, as the bread doesn’t contain an unusual amount of salt. Salt is actually used to counteract the growth or development of yeast in the starter culture for the bread, which is were things get interesting. If yeast strains aren’t growing in the starter, other types of bacteria are free to inoculate the mixture.Lactobacillus  is the most common wild bacteria found in fermented products, and it does play a small role in leaving Salt Rising bread, but the real MVP here is Clostridium perfringens.  Clostridium perfringens is widely known to be the third leading cause of food poisoning in the United States and United Kingdom. It’s also the most common bacteria found in Gas Gangrene infections (symptoms include necrosis, putrefaction of tissue, and toxic gas production) and also produces the noxious gas emitted by dead bodies. I think it goes without saying that this is some pretty nasty stuff. While the baking process renders the bacteria inactive, it still might not be for the faint of heart. But, if you’re like me and you’re more intrigued than disgusted (or at least equally intrigued and disgusted), than Salt Rising bread is a really cool experiment. I could try and go on about the history and science behind this type of recipe, one of my favorite food writers, Harold McGee, wrote an absolutely incredible article about it (the one from Lucky Peach), which I highly recommend reading. So for now, we’ll just get into the recipe itself.

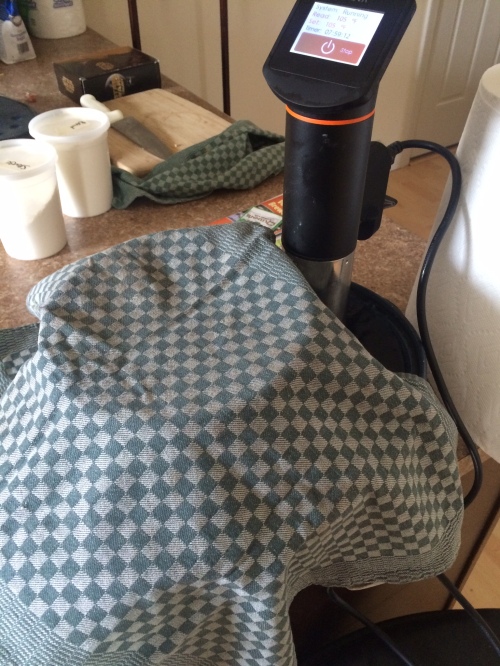
Since the bacteria  normally flourishes in a living host, a crucial part of the recipe is to keep it around body-temperature at all times. Since it require an incredibly long time* to ferment fully, this can be a pretty difficult task. However, with help from an immersion circulator it’s be accomplished without much hassle.

IMG_1841 (1)

Holding at 105F, it’s basically like a nice hot tub for your starter. Also, that’s definitely the original Star Wars trilogy in the background and you should be jealous. With a few key differences, Salt Rising bread isn’t all that different from a regular sourdough. You make a starter to culture some bacteria, add flour for it to grow into a sponge, then add a bunch more flour to form the final dough. The result?

IMG_1852

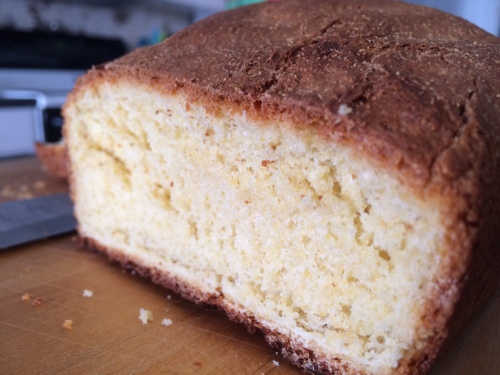
Nice, tight crumb with a thick, crispy crust. While the bread itself didn’t taste all that funky, while it was baking the apartment filled with a not-quite-overwhelming scent of ripe cheese, with a hint of dirty feet. While the process of making the bread was really cool to learn and play around with and the bread was pretty tasty,   I would say that the finished product isn’t entirely worth the time you have to put into it. That being said, its something I would really enjoy doing again and learning more about the processes at work.

Salt-Rising Bread, adapted from Harold McGee

makes 2 loaves

  • Cornmeal, 1 cup
  • Sugar, 1 tablespoon
  • Kosher Salt, 1 teaspoon
  • Whole Milk, 2 cups

Combine cornmeal sugar and salt, mixing thoroughly. Heat milk in a saucepan until just barely boiling. Combine with cornmeal mixture, mixing to combine thoroughly. Cover loosely with a towel and allow to ferment at 105F** for 8-10 hours.

  • Baking Soda, 1 teaspoon
  • Water, heated to 120F, 1 cup
  • All-Purpose Flour, about 2 cups, as needed

Add baking soda and water to starter, mixing to combine thoroughly. Add flour as needed to bake a thick batter. Cover loosely with a towel and allow to ferment at 105F** for 3-4 hours, until bubbly and spongy.

  • Kosher Salt, 1 teaspoon
  • All-Purpose Flour, about 4 cups, as needed

Transfer sponge to the bowl of a stand mixer. Add salt to sponge, then add flour as needed, mixing with a dough hook, until a solid dough is formed. Divide dough into two greased loaf pans, cover loosely with a towel and allow to proof until volume is increased by about one third, 2-6 hours. Preheat oven to 425F. Bake loaves at 425F until browned, about 35-40 minutes. Transfer to a cooling rack and allow to cool completely before cutting and serving.

*I recommend starting this in the late evening for it to be ready by about dinner time the following day. I started mine just before 11am and ended up baking it at 2am, which was kind of a pain in the ass.

**I used an immersion circulator to hold this temperature precisely, but if you can closely monitor the temperature of a water bath by other means, I would say go for it.

Read Full Post »

I know I keep saying that I’m going to be posting more frequently, and that THIS time I’m really going to get back into writing on a regular basis. And I don’t mean that in the “the fans are counting on me!” kind of way (even though you guys are awesome and I love you all dearly), but more in the way that I actually want to keep writing, but the time always slips away from me. Quick update on what’s been going on with me, before we get into the juicy bits:

The past 4 months have been INCREDIBLY hectic. As I said in my last post, my job situation became incredibly unstable. Since then, I’ve been able to nail down an amazing job at a great, newly opened restaurant. The hours have been super crazy, but it’s been really fulfilling to be a part of something new and start from the ground up. I got a promotion really quickly and have been trusted with a lot more responsibility than I originally signed up for, but I think it’s going to be for the best. On the flip side of the coin, shortly after my last post, I was broken up with by my girlfriend. In and of itself, that’s a really hard situation to deal with. Continuing to live together for two months afterwards was possibly the worst experience of my life (so far). There’s no feeling quite as punishing as caring very deeply for somebody, and then one day they up and vanish from your life.  I know now that its through no fault of my own that she and I are in the situation we are, but it still doesn’t make it any easier. That being said (and if you are reading this right now), I hold no animosity towards her, and still want only the best for her moving forward. As for myself, the only thing left to do is keep pushing forward.

“Jedi are aware of the future impacts of action and inaction and of the influence of the past, but live in and focus on the Now. We let ourselves flow like water through the events around us. We embrace the ever changing and fluid world, adapting and changing as it does.”

Part of continuing to push forward to me is getting back into cooking for myself, rather than going the easy route of take out food all the time. In the past few posts I wrote about  how I was starting to drink healthy shakes again, because they seemed to help with my weight loss and were just a generally good way of starting the day off. While I still really like the idea in theory, the problem is that I get bored really quickly and never actually keep on track with making them every morning. Additionally, the kitchen in my last apartment was lacking to say the least (I had MAYBE two square feet of counter space). However, my new apartment has a pretty amazing kitchen, if I do say so myself.

IMG_0438

BOOM. Look at that shit. It may not seem THAT impressive, but it’s a huge step up from any of my previous apartments. Working 80 hour weeks on top of trying to move has been a real challenge, but I managed to get it all done with my sanity (somewhat) intact. On my first real day off after getting everything moved INTO the apartment, I spent the day setting up the kitchen just the way I wanted; a luxury I had never experienced before. I quickly realized that I hadn’t yet gotten a good chance to break in my new KitchenAid mixer I got for Christmas last year.

IMG_0421

Yeah, be jealous. In the spirit of new beginnings, I decided to go back to where it all started: bread.

Artisan Bread at Home

I don’t know if I’ve ever told this story on here, but the way that I started cooking was by baking bread. I’m told that I was probably about 5 or 6 years old and kept pestering my dad for a loaf of this homemade bread that he made pretty frequently at the time. Frustrated, he exclaims “If you want it so badly, why don’t you just make it yourself?”, to which I proceeded to pester him further into showing me how to bake my first loaf of bread. Ever since then, I’ve always had a deep love for breads and baked goods, despite my lack of any actual skill at creating them. Truth be told, when I applied for culinary school, I almost went for baking and pastry just to learn more about breads.

After the big move, I was left with not much in the pantry and even less in my wallet. However, the local co-op has a pretty amazing bulk section, and I could get all the ingredients for two nice, hearty wheat loaves for under $10.

IMG_0425

Since it’s such a simple recipe by design, it wouldn’t do much good for me to delve into the process in too much detail. For those of you familiar with bread baking, it’s pretty standard procedure. For the less familiar, I would suggest brushing up on the basic steps involved and maybe trying out some quick, simple recipes. I was a bit more out-of-practice than I normally am, but I’m really happy with my first foray back into bread baking. For time, energy, money and sanity sake, I think I’m going to start baking a lot more frequently. There’s something that’s just very comforting and familiar about a loaf of bread fresh from the oven.

Whole Wheat Bread, adapted from Artisan Breads at Home with the Culinary Institute of America

Yield: 2 Loaves

  • Water (90 Degrees Fahrenheit), 20.2oz OR 572g OR 2.5c OR 73.2%
  • Honey, 1.3oz OR 36g OR .25c OR 4.6%
  • Molasses, .1oz OR 2g OR 1/8tsp OR .5%
  • Bread Flour, 16.6oz OR 470g OR 3.33c OR 60.1%
  • Whole Wheat Flour, 11oz OR 312g OR 2.5c OR 39.9%
  • Dry Yeast, .2oz OR 7g OR 1tsp OR .8%
  • Kosher Salt, .6oz OR 18g OR 1tbsp OR 2.3%

Put the water, honey and molasses in the bowl of a mixer. Combine the flours and yeast and add to the bowl, then add the salt and place the bowl on a mixer fitted with a dough hook. Mix on medium speed for 8 minutes, making sure to scrape down and flip the dough over twice during this time. After mixing, the dough should have some gluten development butt feel slightly tacky. Place the dough in a lightly oiled bowl large enough for it to double in size and cover with plastic wrap.

Allow the dough to rest and ferment in a warm place for 45-60 minutes, until when lightly touched the dough springs back halfway.

Place the dough on a lightly floured work surface and stretch it out slightly. Fold the dough in thirds. Put the dough back into the bowl, re-cover it with plastic wrap, and allow it to rest for 15 minutes.

Prepare plastic bowls lined with a kitchen towel. Flour the lined bowls generously.

Place the dough on a lightly floured work surface and divide it into two 24oz pieces. Round each piece against the tabletop. Place the loaves in the prepared bowls with the seam side up. Use any extra cloth to cover the loaves and then lightly cover the bowl with plastic wrap.

Place the dough in a warm place for 45-60 minutes, until when lightly pressed the dough springs back halfway.

Twenty minutes before the end of the final fermentation, preheat the oven to 475F. Ten Minutes before baking the loaves, place a tray filled with 3 cups of water below the baking area in the oven to help produce steam.

Lightly oil and flour two loaf pans. Place loaves seam side down in the pans. Spray the loaves with water and let sit for 5 minutes. Score the top of each loaf lengthwise, cutting 1/4-1/2 inch deep. Spray loaves with water again.

Place loaf pans in the oven and immediately reduce the temperature to 450F. Bake for 12 minutes. Remove the steam tray, reduce temperature to 425F and bake for an additional 18-20 minutes. Remove bread from oven and pans, and transfer to a cooling rack.

Read Full Post »

Well, here we are. The final installment of another year of the  52 Weeks of Cooking Challenge. It’s crazy how quickly a year can go by and how much can go by. Since starting the challenge in January, I’ve changed jobs twice, moved twice and I’ve dealt with a lot of professional and personal stress. Luckily, cooking and writing for this blog has given me a bit of release of relaxation. Every week I can kind of sit down and forget about things for a minute and just get everything out on the paper, so to speak. To anybody that’s followed along with these posts for the better part of the past two years, thanks for sticking along. I don’t know how often  this actually gets read, but it’s nice to know that it’s not entirely just to stroke my own ego. Anyway, enough of being mopey! For the final week of the 52 Weeks of Cooking Challenge, we’re celebrating a year of cooking and going all-out with Fancy Ingredients!

When I think of classy, fancy ingredients, nothing quite beats the classic Foie Gras. Just the name brings about the image of snooty French dining, fanciness and class; Foie Gras. For those who don’t actually know what foie gras is, and if you’re not in the food industry it’s entirely likely that you don’t, it is the liver of a duck or goose that has been fattened through a process called gavage, force-feeding through a tube. While the practice of fattening birds for food dates back to at least 2500 BCE in ancient Egypt, it has come under scrutiny in recent years because you know, the whole animal torture thing. While I do enjoy the product, I can’t say I support the means of production. However, many producers are now beginning to develop methods to produce the same product without endangering the health and safety of the animals, something which we can all get behind. As far as I could research, the raw foie gras that I purchased was produced humanely. But for now, we’ll save the morality debate for a later time and just get into the food.

foie

The process of preparing foie gras is long and tedious. I won’t go into the excruciating details, but I used the recipe and method described by Michael Ruhlman. If you’re unfamilliar with Ruhlman or his writings, I suggest that you start some reading. The process starts by taking apart the liver and removing any of the membranes and veins. It’s then soaked overnight in milk to remove some of the gaminess that liver is known to have. After that, a quick overnight cure with salt, pepper, sugar, cognac, and curing salt. Next, the liver is rolled into a tight cylinder, wrapped in cheesecloth, and left to hang and solidify overnight yet again. A quick poach in hot water loosens the flesh a little and releases any remaining air pockets, creating a consistent texture throughout the roll. One last overnight hang was all that was left to finish it off. As per Ruhlman’s serving suggestion, I made a nice loaf of buttery brioche to use as a base, and topped the finished foie with a 25 year-aged balsamic vinegar that I picked up years ago when I was in Italy. When it was all said and done, it was about 2:30 in the morning before I had a finished product. I was already a few beers deep, but all I wanted to do was stay up and eat the whole damn thing. Buttery, fatty, a little tartness from the vinegar, but all brought together by the unmistakable funkiness of the foie. It’s not really a flavor you can explain, it’s just something that you need to experience for yourself. And maybe you won’t always get a chance too, it’s a bit expensive after all. But after a year of writing, cooking, and learning from myself, I was happy to splurge a little and go out with a bang.

I’m happy to have made it through another year of the 52 Weeks of Cooking Challenge. It’s been fun as always, and definitely a good learning experience. In the past two years, I’ve got to make some of my favorite dishes, as well as experiencing new cuisines, techniques, ingredients and inspirations that I had never really looked at before. However, nothing, no matter how good or bad, lasts forever. It is with a heavy heart that I say this will be my last regular submission for the 52 Weeks of Cooking Challenge. I have some other projects I want to focus on for this blog, as well as planning a business venture that I’ve been thinking about for a long time now, so I don’t think I’ll have the time to do the Challenge on top of that. This surely isn’t the end of C&K by any means, it’s just time to move in a new direction with things. Thanks to everyone who has been reading for the weekly recipes, and I hope the new stuff will be just as entertaining!

Read Full Post »

Fall is finally here! At least in Vermont it is, and that means it’s time to break out the flannel, read Robert Frost and eat your weight in pumpkin spice everything. By far, fall is my favorite time of the year. Cold, rainy days speckled with days where it’s still warm enough to wear shorts, not to mention the beautiful scenery and foliage. One of the greatest things about fall? Apples are in season! After maple syrup and terrible jam bands, apples are one of Vermont’s most iconic crops and are used in a wide variety of products, from butters and jams to ciders both soft and hard. One of the first things I ever learned to cook was Apple Crisp, as evident by a presentation I did in 7th grade.  Needless to say, I’m more than excited for the 37th week of Reddit’s 52 Weeks of Cooking Challenge!

When I was younger, every year my grandma would take my brother and I out to this one orchard to pick apples and visit the petting zoo. After eating myself sick and not actually bringing any apples homes, we would stop by the farmstand for a cup of cider and maybe a snack for the road. One of my favorite treats we had over the years for an amazing apple pie that they topped with sharp cheddar cheese. When I was a kid, I never thought much of it. I liked cheese,  I liked apples, I liked pie. No further questioning needed. But as I’ve gotten older, especially around this time of year, I always think back to that orchard and I’ve finally decided to see what was up with the cheddar apple pie.

apple galette

There’s an old English saying that goes “An apple pie without the cheese is like a kiss without the squeeze.” Originating around Yorkshire, where apples and sharp cheese are both abundant, the tradition of serving sweet apple pie with cheese has been around since at least the 19th century. While little info is available on exactly how it got started, my guess is that the fat from the cheese was used to help cut the acid of wild apples that are especially tart or bitter. Either way, the combination is here to stay. I started out with a flaky crust, halfway between a biscuit dough and a traditional pie crust. Rather than the traditional sharp cheddar cheese, I decided to go with a raw, 1 year aged, maple-smoked cheddar. The smokiness of the cheese would add another level to the sweet-and-savory contrast that was already going on. A little bit of cheese went into the crust, then set up in the fridge, waiting to be rolled out. As for the star of the show, I like to use a blend of different apples. I have a blend that I use for homemade cider that also worked out quite well for baking: Fuji, McIntosh, Cortland and Granny Smith. Each of these apples carries a different level of sweetness and acidity, as well as breaking down at different rates during cooking, giving the pie a bit more texture and depth than your standard fare. The apples got tossed with cinnamon and maple to marinate for a bit, folded up in the crust, and topped with a healthy dose of cheese. Baked until golden brown and melty, this might just be the best pie I’ve made in a very long time. The crust was tender and flaky, although the cheese didn’t really come through in the crust itself. But what the crust was lacking in cheesiness was more than made up for by the filling. The sweet spices in the apples and the smoky cheese create the ultimate combination of contrasting flavors.

Apple Galette with Smoked Cheddar

makes 1 pie

For the Crust:

  • All-Purpose Flour, 1 1/2 cups
  • Kosher Salt, 1/2 teaspoons
  • Sugar, 1 1/2 teaspoons
  • Butter, unsalted, 6 ounces
  • Sour Cream, 1/4 cup plus 2 tablespoons
  • Smoked Cheddar Cheese, shredded, 2 tablespoons

For the Filling:

  • Juice of half a Lemon
  • Fuji Apple, 1 each
  • McIntosh Apple, 1 each
  • Cortland Apple, 1 each
  • Granny Smith Apple, 1 each
  • Vermont Maple Syrup, 1 tablespoon
  • Cornstarch, 2 teaspoons
  • Cinnamon, 1 teaspoon
  • Smoked Cheddar Cheese, shredded, 1/2 cup, lightly packed
  • Egg, beaten, 1 each
  • Brown Sugar, as needed

In a large mixing bowl, combine flour, salt and sugar, mixing thoroughly. Cut butter into chunks and add to flour mixture. Rub butter and flour together with your hands until the butter is about the size of peas. Add sour cream and cheese, mixing to form a dough. Remove dough from bowl onto a lightly floured work surface. Shape dough into a thick disk and wrap in plastic. Place dough in refrigerator to set, at least 30 minutes and at most overnight.

Juice half a lemon into a large bowl of water. Peel, core and slice apples, placing them into the lemon water as you work. Once all apples are processed, drain the lemon water from the bowl. Combine apples with maple syrup, cornstarch and cinnamon, tossing to coat evenly. Allow to marinate at least 10 minutes.

Preheat oven to 400F. Working on a lightly floured surface, roll out dough into a circle about 14 inches wide by 1/4 inch thick. Transfer dough to a parchment-lined baking sheet. Arrange apples in the center of the crust as desired, and top with remaining cheese. Fold edges of the crust over the apples, leaving the center open. Brush crust with egg wash and sprinkle lightly with brown sugar. Bake at 400F for 10-15 minutes, until crust starts to brown and cheese begins to melt. Lower temperature to 375F and continue baking for an additional 10-15 minutes, until crust is cooked through. Allow to cool at least 10 minutes before serving.

Read Full Post »

As a cook, it’s always been my hopes to try as many things as I possibly can. New foods, new cuisines, new techniques, recipes, whatever. If I haven’t done it before, I get excited about it. That’s why it’s always hard for me when people ask what my favorite food is.  Everybody has their favorites, but it’s hard for me to peg down one or two dishes when there’s so much to see and experience in the culinary world. If I had to pick one, end-all-be-all food as my favorite, it would definitely be the Reuben Sandwich. However, I already made one for last year’s challenge, so I didn’t want to beat a dead horse.  After scouring through old recipes and memories, I found the perfect dish for the 32nd week of Reddit’s 52 Weeks of Cooking Challenge.

pistachiocake

Every year for as long as I can remember, my grandma has made this amazing pistachio sponge cake for my birthday. It was something that I always looked forward to because it was so delicious, and also I could never get the recipe for it. However, once I was in college I was finally able to get the recipe for another blog that I wrote at the time. Since I’m pretty sure I’m the only person besides my grandma that has the actual recipe (the one she gives out to other people is different so it doesn’t come out as good), I don’t think I’ll be giving it out any time soon. I will say that it involves boxed cake mix, pistachio pudding and sour cream. For whatever reason, I didn’t write down the recipe properly, so this iteration of the cake came out much more dense and not as spongy as it should have.  It still had all the great pistachio flavor, the crispy, nutty topping, and the ultra-moist texture I remember though, so I would consider it a success.

Read Full Post »

First thing’s first, this is my 100th post! I’d like to thank everybody who’s followed along since the beginning, and also anyone who’s stumbled their way here from Facebook or Reddit. It’s been a blast writing and I don’t have any plans on stopping soon.

Taking a step back from ‘MURICA week, where we indulged in the grossest food we can summon, the 30th week of Reddit’s 52 Weeks of Cooking Challenge is all about clean eating; using minimally processed foods, fresh ingredients, and none of the garbage you can find in the freezer at the store. Contrary to most healthy eating crazes that have swept the country in the past decade or two, the idea of clean eating comes about as more than just a way to lose a few pounds. Rather than focusing on cutting out certain things from your diet in favor of other “healthier” options, clean eating is centered more on keeping food in a state as close to it’s natural form as possible. As much as people like to throw around the idea that processed food is the devil, every food is processed in one way or another before it gets to your table. Even that farm fresh lettuce you’re so proud of yourself for buying had to have been picked, trimmed and washed before making it into your salad bowl. That’s the kind of processing we want though, we’re okay with that. It makes the food easier for us to eat without demolishing the nutritional value.

For this week, I couldn’t help but think of all the gross processed foods that I couldn’t live without when I was a kid. My go-to after-school snack? Microwaved chicken patties with Kraft singles on white bread. Sloppy, tasteless food and empty calories. I didn’t have to think about where the food came from, how it was handled, or any of the other stuff that is second nature to me now. Above all else, there was one frozen box that I always loved, and still continue to love shamelessly to this day: Hot Pockets. I won’t try and make the point that Hot Pockets are actually good food, because I know that’s a losing battle. Hot Pockets are gross, probably more so than most highly processed foods. And even when just this year there was a massive recall on certain Hot Pockets for contained “diseased and unsound” meat, I haven’t been swayed from them. They’re just so gross and sloppy… and delicious.  I’m getting side tracked, where was I? Oh right, clean eating. For this week, I wanted to make a “clean” version of the most amazing/disgusting processed food out there, the almighty Hot Pocket.

hot pockets

After perusing the freezer section for longer than I probably should have, I decided that the grossest Hot Pocket had to be Barbecue Style Beef, so that was my starting point. As I’ve said the past couple weeks, I’ve been in the process of moving. Now that I’m all settled in at the new place, I’m lucky enough to have a Farmer’s Market less than a block away every weekend. This week, I picked up a nice slab of locally raised grass-fed beef from Stony Pond Farm. I braised the beef overnight with tomatoes, peppers, onions, and homemade chili powder. After shredding the beef, I discarded the liquid and cooked the vegetables down into a nice barbecue sauce, seasoning it up with just a little vinegar, salt and pepper. For the dough, I used a very basic pastry dough with local flour and raw cane sugar. The result: Juicy, tender shreds of beef wrapped in a light, flaky crust. It reminded me a lot of the store-bought counterpart, but something about it was just more… real. For the ultimate test, I froze a few of the pockets for reheating another day. After about 15 minutes in a 400F oven, my homemade pockets held true to form: crispy and brown on the outside, frozen in the middle. An additional few minutes was all that was needed to bring it to the only other option, boiling lava hot. It seems like no matter what you do, some things don’t change all that much.

Barbecue Beef Hot Pockets

makes about 5 pockets

  • Beef, 1 lb
  • Roma Tomato, chopped, 3 each
  • Yellow Onion, sliced, 1 each
  • Yellow Bell Pepper, seeded, chopped, 1 each
  • Chili Powder, 2 tablespoons
  • Instant Coffee, 2 tablespoons
  • Water, as needed
  • Cider Vinegar, as needed
  • All-Purpose Flour, 1 1/2 cups
  • Dry Milk Powder, 1/8 cup
  • Raw Sugar, 1/8 cup
  • Kosher Salt, 1/2 teaspoon
  • Instant Yeast, 3 teaspoons
  • Water, warm, 1/2 cup

Combine beef, tomato, onion, pepper, chili powder and coffee in a slow cooker. Set temperature to low and let cook overnight, about 8 hours. Remove beef from slow cooker and shred. Strain liquid from slow cooker and reserve solids. Puree solids until smooth. In a medium sauce pot, cook vegetable puree until very thick, about 1 hour. Thin puree with water as needed. Season to taste with vinegar, salt and pepper. Combine shredded beef and sauce.

Preheat oven to 350F. In the bowl of a stand mixer, combine flour, milk powder, sugar, salt and yeast. Add water and mix on medium speed until dough forms, about 6 minutes. Divide dough into 5 equal portions. Roll out to 1/8 inch thickness on a lightly floured work surface. Divide beef among rolled out dough. Wrap dough around meat, pressing seams to seal. Place pockets seam side down on a lightly greased baking sheet. Bake pockets at 350F until golden brown, about 25 minutes. Serve warm, or cool completely before wrapping in wax paper and freezing. To reheat, cook pockets in a 400F oven for 20 minutes.

Read Full Post »

“And when you grow up, you have to drink beer.” So says the Governator himself, so who can argue? If you follow the Facebook Page, it’s no secret that I love beer. I really love beer. I love drinking beer, I love brewing beer, I love reading about beer, I love talking about beer. If you’re into beer, chances are we’ll be friends if we aren’t already. I think that my love of beer started when I was a kid: my dad brewed beer pretty often at home and I always loved helping him out in the kitchen whenever I could. That time brewing with my dad kind of set me up with a mindset on what beer should be, and what beer can mean to people. Even through college (most of the time), I’ve always said that I would prefer to drink two good beers than ten crappy ones. Luckily, I live in a state with some of the best beer in the country, two of which being ranked #1 in the world last year, and this affords me many opportunities to sample all that the vast world of beer has to offer. But with such proliferation of crappy beers in America, it’s understandable why people assume that craft beer enthusiasts are all snobs. And while it’s true that there are those among us who will be douchebags about the beer we drink, on the craft side as well as the domestic, beer lovers are generally kind, sociable people, if not a bit too enthusiastic at times. The term “beer snob” makes it seem like I’m the one doing something wrong for loving a certain thing and wanting the best version of that thing that’s available to me. Sure, Anakin Skywalker is an okay character and the prequels have some merit in their own way, but a cheap, watered-down version of something will never hold up when compared to the genuine article, and I don’t think anybody should be called a dick for preferring Luke.

While the craft beer industry had made great strides in bringing lesser-known styles out of the woodwork and into the hands of consumers, there are still countless styles across the world that have yet to be explored by the American audience. One such style that comes quickly to my mind is the Belgian Lambic. Named after the village of Lembeek, near Brussels, Lambic is a style that is seldom brewed outside of Pajottenland region of Belgium. If you know much about beer, you probably know that brewers are incredibly picky about their yeast. Carefully cultivated strains of yeast are used by breweries around the globe to produce precise, consistent flavors and fermentation in their beer. Lambic, however, takes a sharp turn down the opposite fork in the road. After the wort is cooled, it’s exposed in open-air fermentation vessels in order for wild yeast and bacteria to inoculate the brew. This gives lambic it’s distinct sour flavor, setting it apart from almost all other styles of beer on Earth. My first exposure to this style of beer came as a huge shock. I forget which beer it was specifically, but in formal dining service class in school we did a tasting of a few beers on the menu and one was a lambic. Our professor warned us that it was sour and most people probably wouldn’t enjoy it, but I thought myself to be a pretty open-minded beer drinker and assumed it would be great. After a big swig from the glass, I couldn’t have been more wrong. If I didn’t know any better at the time, I would have thought somebody swapped my glass with vinegar, it was that sour. It was so off-putting that it made me wonder if there had been a mistake in the brewing process, to which I was assured that there hadn’t been. But it was interesting enough to make me go back for a second taste, and to start seeking out different varieties of lambic when I had the opportunity. Now, lambic has become one of my favorite styles. Admittedly, when I’m in the mood for “a beer”, lambic isn’t my go-to, but I’ve found myself in lambic moods before, and nothing quite beats a cold, sour beer on a warm, sunny day. With lambic being so completely different from other beers, I also really enjoy cooking with it.

lambic brownies

Certain types of lambic add fruits into the fermentation for added color, flavor, and fermentable sugars. Common varieties include apple and raspberry, but my favorite by far is Kriek Lambic, with sour cherries. It may be a bit intimidating to some, considering the beer is sour to begin with, but the cherries add a really great flavor as well as an extra punch of sourness. I’ve had a few different chocolate cakes that were made with stout beer, which creates a rich, deep flavor incomparable to any other dessert. While lambic is the polar opposite of stout, cherries and chocolate are a classic pairing and I figured that adding a dose of Kriek to dark, fudgy brownies would evoke a similar flavor to the chocolate stout cake. Much to my dismay, the sourness of the beer didn’t come through in the final product. However, the rich flavor of the cherries shone through as a bright contrast to the heavy chocolate and the slight funk from the wild yeasts added a subtle undertone that offset the whole thing very nicely. If you’re looking to expand the horizons of your beer palette, but are wary of trying something so incredibly, unequivocally out-there, these brownies may be the push off the diving board that you need. You’ll thank me later.

Dark Chocolate Kriek Lambic Brownies

makes about 2 dozen brownies

  • Dark Chocolate, 8 oz
  • Semi-Sweet Chocolate, 8 oz
  • Butter, unsalted,6 tablespoons
  • All-Purpose Flour, 1 cup
  • Cocoa Powder, unsweetened, 3/4 cup
  • Kosher Salt, 1/4 teaspoon
  • Eggs, 4 each
  • Granulated Sugar, 1 cup
  • Kriek Lambic, 10 oz

Preheat oven to 375F. Over a double boiler, melt chocolate and butter together, mixing until smooth. In a large bowl, sift together flour, cocoa powder and salt. In the bowl of a stand mixer, combine eggs and sugar and whip until fluffy. Add melted chocolate to egg mixture. While mixing on medium speed, gradually add flour mixture. After flour mixture is incorporated, add lambic, mixing until incorporated (batter will look thin initially, but will thicken as it mixes). Line a 9×9 baking dish with aluminum foil. Transfer batter to prepared baking dish and bake at 375F until a toothpick pulls clean from the center, about 35 minutes. Transfer to a wire cooling rack and allow to cool before cutting into squares.

Read Full Post »

No matter how great of a cook you are or how finely tuned your palette is, when you were younger I guarantee that there were a litany of foods that you hated. For a lot of kids, vegetables might as well be Skeletor, and for a good reason. From birth, our brains are programmed to find sweet things desirable and other flavors less-so. Naturally, this leads to kids eating mostly sweet foods for the better parts of their early lives and not being exposed to vegetables or other foods on the spectrum of taste and in turns leads to kids not wanting to try new foods. Unfortunately, many people are never put into a situation where they need to try new foods and carry this habit into adulthood. We’ve all got to face our fears at some point though, and the 4th week of Reddit’s 52 Weeks of Cooking Challenge is just that: cooking with ingredients that you hated as a kid.

Personally, you couldn’t pay me enough to eat anything green. I was a PB&J-and-hot-dogs-five-nights-a-week kind of kid, not to mention my dad’s infamous peanut butter hot dogs. Once I got into my teens and started working in professional kitchens, I did my damnedest to avoid trying anything new. I quickly learned that you can’t make good food without tasting it first, so I reluctantly started trying things. Surprise surprise: food tastes awesome. I was still  a little wary about trying a lot of things, but after plenty of insistence from my friends and chefs, I eventually grew out of distrusting new foods.  However, there were still a few things I really couldn’t stomach. One example sticks out in my mind more than anything else: mushrooms. Nothing was appealing about them. They tasted like dirt and looked like a turd. Soggy and squishy…. blech. I could never really even stand the smell of them cooking. This was the one food that I was pretty certain I would never conquer. One night at culinary school, my friends and I were eating dinner at the banquets and catering class, as was required of all the first semester students. I didn’t get a chance to look at the menu ahead of time, but I was pretty sure whatever they were serving would be awesome. But then… the mushrooms came. I could smell them across the dining room as the student servers were bringing in the plates. They set our plates down in front of us and it was all that I could do not to gag (mind you, I was seventeen at the time). My friends dug in happily and I sat there in awkward silence. “What are you doing?” a few of them asked “I don’t like mushrooms, I’m not going to eat this” “Where are you right now? You’re in culinary school. You want to be a chef. You need to shut up and eat this right now.” I was still pretty insistent that I didn’t want any, but after a few minutes of poking and prodding I decided that it would be worth it just to shut them up. So I dug in. Much to my surprise, the dish was phenomenal. The mushrooms didn’t taste anything like any way I had had them before. They were earthy, but not dirt-y. They were perfectly crispy, not soggy and wet. Everything that could have gone right with this dish, did. I knew that if I needed to make something I hated as a kid, this would have to be it: the dish that not only spawned my love of mushrooms, but helped to conquer my fear of the culinary unknown.

vol au vent

The dish: Mushroom Vol-au-Vent. As with most things at the CIA, it was a classical French preparation. A mix of mushrooms, cooked down with butter and herbs until crispy,then piled into a flaky puff pastry cup. Simple and elegant, it ended up being one of the most memorable dishes from my time in school. At first I wanted to do this with homemade puff pastry. Any bakers that are reading know what a pain puff pastry can be to make, but I wanted to give it a shot. The principle isn’t all that complicated: pastry dough a butter folded together to create hundreds of thin layers. When baked, the butter creates steam and puffs up the layers of pastry. Simple enough, right? The problem comes when you get tears in the layers, making it so the pastry doesn’t puff up very much. If I did my math correctly, I think I had around a thousand layers in my dough. It must have had some tears throughout it though, because it only puffed to about twice the original thickness and was still very dense in the center. Luckily though, store-bought puff pastry is readily available in nearly every supermarket. After a thaw overnight in the fridge, the puff pastry sheets are ready to be cut to shape and baked off. For my filling, I tried to keep it as true to the original dish as I could. I used a blend of oyster, shitake, and button mushrooms, plenty of thyme, and a few cloves of garlic. I cooked them down in butter until they were nice and crispy (the best possible thing for small mushrooms), then tossed them with a little crème fraîche to bind them together into a filling. After carefully hollowing out a few of the pastries, all that was left was to fill them and chow down. It didn’t come out quite like I remembered, but it was still fantastic. Light and airy pastry with rich, earthy mushrooms. Opposites attract, right? I’m really glad that I no longer turn my nose up at new foods. I’m usually even okay with trying foods that I know I don’t like just to see if my mind would get changed. Next time you go out into the big, bad world of food, maybe try something new. Push your boundaries, make yourself uncomfortable for a minute. What’s the worst that could happen?

Mushroom Vol-au-Vent

makes about 6 pastries

  • Puff Pastry, thawed, 1 sheet
  • Egg wash, as needed
  • Mixed Mushrooms, chopped finely, 8 ounces
  • Fresh Thyme, chopped, 3 sprigs
  • Garlic, minced, 2 cloves
  • Butter, about 4 tablespoons
  • Crème Fraîche, 2 tablespoons

Preheat oven to 350F. Cut puff pastry in desired shape (squares or rounds) and place onto a parchment lined baking sheet. Brush pastry with egg wash. Bake at 350F until puffed and golden brown, about 30 minutes. While pastry is baking, cook mushrooms: in a large saute pan over medium-high heat, combine mushrooms, thyme, garlic and butter. Cook until mushrooms are crispy, about 15-20 minutes. Stir crème fraîche into mushrooms. When pastry is done, remove from oven. Using a sharp knife, gently cut a divot into each pastry large enough to hold filling. Fill pastries with about 1/4 cup of filling each. Serve warm.

Read Full Post »