Feeds:
Posts
Comments

Posts Tagged ‘apple’

As we make our way into the second half of Reddit’s 52 Weeks of Cooking Challenge, we take on a subject of great debate. Depending where your own culinary experience and background, creating dishes from scratch may or may not seem such a daunting task. Since the industrialization of the American food system in the early 20th century, recipes and cookbooks developed to rely on ready-made ingredients to ease the burden place on home cooks, and free up more time for whatever else they wanted to do. So nowadays, it’s often “a box of this, two cans of that”, and it’s just like mom used to make. And sometimes, utilizing processed ingredients will actually yield better results. I briefly worked with a chef  who boasted that everything was made from scratch except ketchup, because “you can’t make ketchup better than Heinz” (a statement which I debate with myself constantly), and I can tell you from experience that at Thanksgiving time, a from-scratch Green Bean Casserole doesn’t hold a candle to opening a can of mushroom soup and  French’s Fried Onions. Many cooks grew up accustomed to these kinds of dishes, so when you do the recipe totally from scratch, it  almost feels more like more of an accomplishment. Reaching for flour and cocoa rather than a box of brownie mix is definitely more rewarding, if not a bit more time consuming.

On the opposite side of things, in professional kitchens, if you’re not doing your menu nearly entirely from scratch, it’s viewed as lazy. In the modern restaurant, from scratch is just how things are done. It’s more work, but it sets you apart from lower-end establishments. And with margins as slim as they are already, customers aren’t interested in paying for things they can buy at the grocery store.

I think I land somewhere in the middle of this paradigm: As a professional cook, I have the mentality of wanting to everything from scratch, even when I cook at home. But a lot of times, you can’t do at home what you can do in a working kitchen, and it’s costly to try at that. But, there are definitely things that you can do at home pretty easily and cheaply to give yourself the accomplished DIY feeling we all long for.

The late, great Carl Sagan once said “If you wish to make an Apple Pie from scratch, you must first invent the universe”. It’s comment on how the constituent particles that make up the world around us all had to have come from somewhere else, and we’re just kind of rearranging things that are already here. Even with my professional background, I  think creating the universe to make a pie is a bit out of my range, but Apple Pie can be a good jumping-off point.

IMG_2569.JPG

So to make is as from-scratch  as possible, I decided that there were really just two things I could do out of the ordinary:

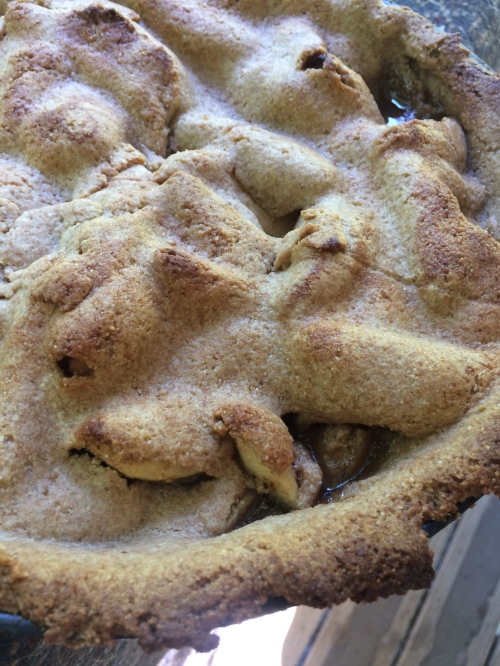
Grind My Own Flour: Luckily, the bulk section at the supermarket carries whole wheat berries, so it was just a matter of picking some up and grinding it as finely as possible. You can buy countertop grain mills for home use (which I’ve read are pretty effective), or if you have access to a high-power blender, that works pretty well too. Either way, I really wouldn’t suggest doing this, at least for a pie crust. The resulting product is incredibly coarse, and as you can see in the photo above, yields a very crumbly crust, closer to a cobbler than a pie. The flavor was alright, but the texture was way off. In any case, it was something I had never tried before, so even the negative results are beneficial.

Make My Own Butter: This one is actually super simple for anyone to do at home. All it involves is cream and agitation, maybe some salt if you want to, but that’s it. Just add cream to the bowl of a stand mixer or food processor and whip the shit out of it. It will begin to thicken to whipped cream consistency and eventually break into solid butterfat and liquid buttermilk. Collecting the small yellow lumps of butterfat into a mass and squeezing any residual liquid out of it yields an immensely rich and creamy butter that will function exactly the same as the store bought variety.

So really, the crust was the biggest thing done from scratch, and it was kind of a letdown overall. However, I used Alton Brown’s Super Apple Pie recipe for the filling and was blown away by the results. Largely the same as most filling recipes, the big differences here are lime juice and Grains of Paradise, a spice commonly used in English baking . Unless you’ve got a homebrew store nearby, you’re unlikely to come across Grains of Paradise. Black Pepper is a great substitute, which I used myself, and provides some really interesting savory notes to an otherwise very sweet dessert.

So, the lesson learned here? Don’t grind your own flour for pie crust, but definitely make your pies from scratch.

Read Full Post »

Fall is finally here! At least in Vermont it is, and that means it’s time to break out the flannel, read Robert Frost and eat your weight in pumpkin spice everything. By far, fall is my favorite time of the year. Cold, rainy days speckled with days where it’s still warm enough to wear shorts, not to mention the beautiful scenery and foliage. One of the greatest things about fall? Apples are in season! After maple syrup and terrible jam bands, apples are one of Vermont’s most iconic crops and are used in a wide variety of products, from butters and jams to ciders both soft and hard. One of the first things I ever learned to cook was Apple Crisp, as evident by a presentation I did in 7th grade.  Needless to say, I’m more than excited for the 37th week of Reddit’s 52 Weeks of Cooking Challenge!

When I was younger, every year my grandma would take my brother and I out to this one orchard to pick apples and visit the petting zoo. After eating myself sick and not actually bringing any apples homes, we would stop by the farmstand for a cup of cider and maybe a snack for the road. One of my favorite treats we had over the years for an amazing apple pie that they topped with sharp cheddar cheese. When I was a kid, I never thought much of it. I liked cheese,  I liked apples, I liked pie. No further questioning needed. But as I’ve gotten older, especially around this time of year, I always think back to that orchard and I’ve finally decided to see what was up with the cheddar apple pie.

apple galette

There’s an old English saying that goes “An apple pie without the cheese is like a kiss without the squeeze.” Originating around Yorkshire, where apples and sharp cheese are both abundant, the tradition of serving sweet apple pie with cheese has been around since at least the 19th century. While little info is available on exactly how it got started, my guess is that the fat from the cheese was used to help cut the acid of wild apples that are especially tart or bitter. Either way, the combination is here to stay. I started out with a flaky crust, halfway between a biscuit dough and a traditional pie crust. Rather than the traditional sharp cheddar cheese, I decided to go with a raw, 1 year aged, maple-smoked cheddar. The smokiness of the cheese would add another level to the sweet-and-savory contrast that was already going on. A little bit of cheese went into the crust, then set up in the fridge, waiting to be rolled out. As for the star of the show, I like to use a blend of different apples. I have a blend that I use for homemade cider that also worked out quite well for baking: Fuji, McIntosh, Cortland and Granny Smith. Each of these apples carries a different level of sweetness and acidity, as well as breaking down at different rates during cooking, giving the pie a bit more texture and depth than your standard fare. The apples got tossed with cinnamon and maple to marinate for a bit, folded up in the crust, and topped with a healthy dose of cheese. Baked until golden brown and melty, this might just be the best pie I’ve made in a very long time. The crust was tender and flaky, although the cheese didn’t really come through in the crust itself. But what the crust was lacking in cheesiness was more than made up for by the filling. The sweet spices in the apples and the smoky cheese create the ultimate combination of contrasting flavors.

Apple Galette with Smoked Cheddar

makes 1 pie

For the Crust:

  • All-Purpose Flour, 1 1/2 cups
  • Kosher Salt, 1/2 teaspoons
  • Sugar, 1 1/2 teaspoons
  • Butter, unsalted, 6 ounces
  • Sour Cream, 1/4 cup plus 2 tablespoons
  • Smoked Cheddar Cheese, shredded, 2 tablespoons

For the Filling:

  • Juice of half a Lemon
  • Fuji Apple, 1 each
  • McIntosh Apple, 1 each
  • Cortland Apple, 1 each
  • Granny Smith Apple, 1 each
  • Vermont Maple Syrup, 1 tablespoon
  • Cornstarch, 2 teaspoons
  • Cinnamon, 1 teaspoon
  • Smoked Cheddar Cheese, shredded, 1/2 cup, lightly packed
  • Egg, beaten, 1 each
  • Brown Sugar, as needed

In a large mixing bowl, combine flour, salt and sugar, mixing thoroughly. Cut butter into chunks and add to flour mixture. Rub butter and flour together with your hands until the butter is about the size of peas. Add sour cream and cheese, mixing to form a dough. Remove dough from bowl onto a lightly floured work surface. Shape dough into a thick disk and wrap in plastic. Place dough in refrigerator to set, at least 30 minutes and at most overnight.

Juice half a lemon into a large bowl of water. Peel, core and slice apples, placing them into the lemon water as you work. Once all apples are processed, drain the lemon water from the bowl. Combine apples with maple syrup, cornstarch and cinnamon, tossing to coat evenly. Allow to marinate at least 10 minutes.

Preheat oven to 400F. Working on a lightly floured surface, roll out dough into a circle about 14 inches wide by 1/4 inch thick. Transfer dough to a parchment-lined baking sheet. Arrange apples in the center of the crust as desired, and top with remaining cheese. Fold edges of the crust over the apples, leaving the center open. Brush crust with egg wash and sprinkle lightly with brown sugar. Bake at 400F for 10-15 minutes, until crust starts to brown and cheese begins to melt. Lower temperature to 375F and continue baking for an additional 10-15 minutes, until crust is cooked through. Allow to cool at least 10 minutes before serving.

Read Full Post »

Most well known for their chocolates, beers and waffles, Belgium offers a melting pot of cuisine, borrowing from their French, German, and Dutch neighbors. It’s often said of Belgian cuisine that is made in the quantity of German cuisine, but with the quality of French cuisine. With such a rich cultural history, it’s not surprising that Belgians take great pride in their food and cooking. While street vendors offer a quick bite for those craving waffles or frites-mayonnaise, most restaurants tend to approach things with a greater sense of finesse, and meals are not often hurried.

I’ll admit that I’m not terribly familiar with Belgian cuisine, but I do know a thing or two about Belgian beers. Beer in Belgium takes quite a drastic turn from beer cultures around the world. In America, hops have been the dominating ingredient in recent years, while in much of Europe, malt is the star of the show. In Belgium however, yeast is the star of the show. Many brewers in the small country rely on wild fermentation to craft their beers, letting the natural bacteria of the environment go to work converting the sugars to alcohol. Since the use of wild yeasts can be unpredictable and imprecise, Belgian beers are revered far and wide for their tart, sour flavors, with many beers leaving the yeast cells in the bottle for added flavor. Since I was unfamiliar with what makes the food distinctly Belgian, for the 14th week of Reddit’s 52 Weeks of Cooking Challenge I took to the Wikisphere to find a traditional dish and worked with the recipe to incorporate some delicious Belgian beer.

poulet frites

Poulet-Frites-Compote is a traditional Belgian dish consisting of roast chicken served with French fries and applesauce.  I brined the chicken with salt, orange, coriander and Saison Dupont, a Belgian farmhouse-style ale. After soaking in the brine overnight,  I slathered on some butter and let it roast until golden brown. I just got in my new toy, an Anova Immersion Circulator, and was itching to try it out all day so I tried out the ChefSteps method for French fries, which involved brining the fries with sugar and salt, then poaching in a vacuum bag to begin cooking the fries before twice-frying them. They came out pretty well, but I didn’t notice any huge difference between that method and the normal method of twice-frying. As for the apple compote, I used a blend of apples that I’ve been using for cider lately and cooked them down with a little sugar, lemon, and cinnamon. Altogether, everything was really simple and the flavors complemented each other really nicely. The sweet and salty combination of the fries and apple compote was perfect, and the distinct flavors of the Saison came through really nicely in the chicken. Dishes like these are some of the ones that I like the most: Everything is very simple in it’s own right, but when put together in one dish they become more than just the sum of the parts.

Belgian Beer-Brined Chicken

makes 1 chicken

  • Water, 12 ounces
  • Orange, sliced, 1 each
  • Coriander, crushed, 1 teaspoon
  • Salt, 1/3 cup
  • Saison, Witbier, or Hefeweizen, 12 ounces (1 bottle), cold
  • Roasting Chicken, 1 each
  • Butter, softened, as needed

Combine water, orange, coriander and salt. Bring to a boil to dissolve salt, then remove from heat. Chill brine completely. Add beer to cooled brine. Place chicken in brine and allow to soak overnight. Preheat oven to 500F. Remove chicken from brine and pat dry. Rub softened butter underneath the skin of the chicken, covering the breasts, legs, and thighs. Place oranges from brine into a roasting pan and place chicken on top. Roast at 500F until chicken is deep brown. Reduce heat to 350F and continue to cook until the internal temperature between the leg and thigh reads 155F on a probe thermometer. Remove from oven and allow to rest 5-10 minutes before carving.

Apple Compote

makes about 2 cups

  • McIntosh Apple, 2 each*
  • Fuji Apple, 1 each*
  • Gala Apple, 1 each*
  • Cortland Apple, 1 each*
  • Water, 1 tablespoon
  • Sugar, 1 tablespoon
  • Lemon Juice, 1 tablespoon
  • Cinnamon Stick, 1 each

Peel, core and dice all the apples. Add to a sauce pot with water and cook over low heat until apples are softened, but still retain some texture. Add sugar, lemon and cinnamon and continue cooking for 5 minutes. Remove from heat and allow to cool completely. To serve, remove cinnamon stick and warm slightly.


Read Full Post »

The Vermonter

100 years ago, nobody would have to think twice about buying local food products simply because there wasn’t really any other choice.  Before the advent of refrigeration and industrial shipping, food had a relatively short shelf life and consumers didn’t really have the luxury of stockpiling nonperishable products. Today however, the local food scene is seen by many an exclusive club that only a privileged few can afford to be a part of. Much to the contrary, when you look into it just a little bit, you’d be surprised as to how much food is actually produced in your own community and how affordable to can really be. Luckily, I live in Vermont which was recently rated by NPR as the #1 state in the nation for the local food scene. With almost limitless directions I could go, the 25th week of Reddit’s 52 Weeks of Cooking Challenge was sure to yield some tasty results.

 I felt that it would be best to go with something that I’m familiar with and passionate about: sandwiches. The Vermonter Sandwich originated in the 90’s at Sweetwater’s, a popular Burlington bar and restaurant, by Jason Maroney, a cook and waiter. “[The Vermonter] was something we could add that could provide a different element. Not a lot of people do things with apples.” Maroney has said about the sandwich.  Since it’s inception, the sandwich has been adopted and modified in countless recipes. At Basil Tree Catering in Somerville, Mass., The Vermonter is a roast turkey, cheddar and apple sandwich on cranberry bread. At Ken’s American Cafe in Littleton, Mass., it’s two eggs, any style, with bacon, sausage and three pancakes. At The Pizza Joint in Stowe, Vt., it’s a specialty pizza with ever-changing ingredients. Wherever you go though, the staples are as follows: Meat, cheddar, apple and a sweet enriched bread. To celebrate local foods and the history of this iconic sandwich, I made my own version of The Vermonter.

The Vermonter

For the turkey, I got an organic turkey breast from Misty Knoll Farms. I wanted to go with ham to keep it more traditional, but I was also itching to try out my new immersion circulator so I went with the turkey*.  I vacuum packed the breast with thyme, sage, and butter, then circulated at 145F for about 3 hours. Not to too my own horn or anything, but this was seriously the best turkey I’ve ever made. The low, slow cooking process cooks the turkey perfectly without being overdone and dry. Green apples provide a nice tart crunch and Grafton Village Cheese Company cheddar melts the whole thing together. Sandwiched between Maple Walnut bread from Klinger’s Bread Company and slathered with homemade maple mustard using syrup from Nestle Nook Farm. To top it all off, an ice cold Rugged Mountain Root Beer from Vermont Sweetwater Bottling Company.  I’ve never made this sandwich before, but it may now be tied with the Reuben as my all-time favorite. The perfect balance of sweet, savory and tart with a gamut of complimenting and contrasting textures and just the right amount of fattiness to tie the whole thing together.

Sous-Vide Turkey Breast

  • Turkey Breast, boneless, 1 each
  • Thyme, fresh, 4 sprigs
  • Sage, fresh, 4 sprigs
  • Butter, softened, 4 tablespoons

Cover turkey in butter and fresh herbs. Vacuum seal** in a heat proof plastic bag and let sit 24 hours. Bring turkey to room temperature. Circulate in a water bath at 145F for 3 hours. Shock bag in ice water to stop cooking. Remove turkey from bag and remove herbs. Sear turkey, skin side down, in a cast iron or heavy-bottom skillet until browned and crisp. Remove from pan and slice thinly  across the grain.

Maple Mustard

  • Whole-Grain or Coarse-Grain Mustard, 1/2 cup
  • Vermont Maple Syrup***, to taste

In a small bowl, combine mustard and maple syrup, sweetening to taste.

*Clearly, most people wont have access to an immersion circulator, but roasted turkey would also work perfectly or even your favorite deli turkey.

**If you do have access to a circulator, you need to vacuum seal your food before you can use it. The home-sized version of the FoodSaver works well, but is a bit pricey. I used Ziploc Vacuum bags which provide a really good seal, don’t appear to degrade with long exposure to low heat, and are also much cheaper.
***As I’ve said before, there is no acceptable substitute for Vermont Maple Syrup. Seriously.

Read Full Post »